Converting Video to MP3 using FFmpeg for Transcription
FFmpeg is a powerful, open-source tool for handling multimedia files. This guide will show you how to use FFmpeg to convert video files to MP3 audio format, which is particularly useful when you need to transcribe large video files but face upload limits on transcription services. By extracting the audio as an MP3, you can significantly reduce the file size while retaining the necessary content for transcription.
Installation on Windows
Downloading FFmpeg
- Visit the official FFmpeg download page: https://ffmpeg.org/download.html
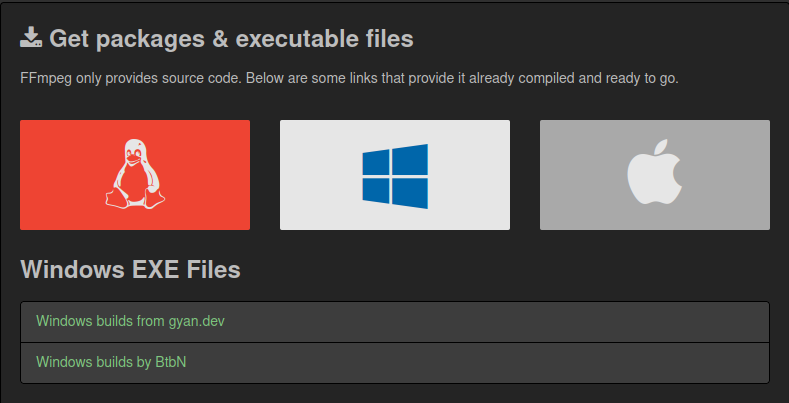
- Under the "Get packages & executable files" section, click on the Windows logo.
- You'll be redirected to a page with various builds. Look for the "Windows builds from gyan.dev" section.
- Click on the link for the latest release. It should say something like "ffmpeg-release-full.7z".
- Save the file to your computer.

Extracting and Setting Up FFmpeg
- Extract the downloaded .7z file using a tool like 7-Zip or WinRAR.
- Inside the extracted folder, you'll find a folder named "bin" containing the FFmpeg executable files.
- Copy the entire "bin" folder to a location on your computer, e.g., "C:\Program Files\FFmpeg".
Adding FFmpeg to System PATH
- Right-click on "This PC" or "My Computer" and select "Properties".
- Click on "Advanced system settings".
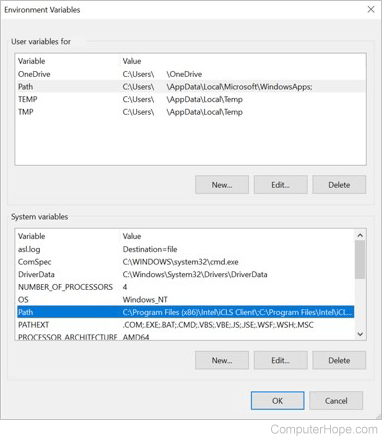
- In the System Properties window, click on the "Environment Variables" button.
- Under "System variables", find and select the "Path" variable, then click "Edit".
- Click "New" and add the full path to your FFmpeg bin folder (e.g., "C:\Program Files\FFmpeg\bin").
- Click "OK" to close all windows.

Verifying Installation
- Open Command Prompt (you can search for "cmd" in the Start menu).
- Type the following command and press Enter:
ffmpeg -versionIf FFmpeg is correctly installed, you should see version information displayed.

Using FFmpeg from Command Prompt
- Open Command Prompt (search for "cmd" in the Start menu).
- Use the
cdcommand to navigate to the folder containing your video files. For example:
cd C:\Users\YourUsername\Videos- Run the FFmpeg command to convert your video:
ffmpeg -i myvideo.mp4 myaudio.mp3Remember to replace myvideo.mp4 with your actual video filename and myaudio.mp3 with your desired output filename.
Basic Conversion Command
To convert a video file to MP3, use the following basic command structure:
ffmpeg -i input_video.mp4 output_audio.mp3Replace input_video.mp4 with your video file name and output_audio.mp3 with your desired output file name.
Advanced Options
Setting Bitrate
To specify the audio bitrate:
ffmpeg -i input_video.mp4 -b:a 192k output_audio.mp3This sets the bitrate to 192 kbps. Common values are 128k, 192k, 256k, and 320k.
Changing Sample Rate
To change the audio sample rate:
ffmpeg -i input_video.mp4 -ar 44100 output_audio.mp3This sets the sample rate to 44.1 kHz, which is standard for most audio files.
Combining Options
You can combine multiple options:
ffmpeg -i input_video.mp4 -b:a 192k -ar 44100 output_audio.mp3Batch Conversion
To convert multiple files, you can use a simple batch script:
- Create a new text file and paste the following content:
@echo off
for %%a in ("*.mp4") do (
    ffmpeg -i "%%a" -b:a 192k "%%~na.mp3"
)
pause- Save the file with a
.batextension (e.g.,convert_to_mp3.bat) in the same folder as your video files. - Double-click the batch file to run it. It will convert all MP4 files in the folder to MP3.
By following this guide, you can easily convert large video files to more manageable MP3 audio files. This is particularly useful when you need to transcribe content from videos that exceed the upload limits of transcription services. The extracted MP3 files retain all the audio information necessary for accurate transcription while significantly reducing the file size.
